DIY Cold Plunge Tub: Complete Build Guide 2026 (Stock Tank, Chiller & Full Parts List)
In this guide
DIY vs commercial: the cost case
Commercial cold plunge tubs from brands like Plunge, Renu Therapy, and BlueCube cost $4,000–$10,000+ for a fully integrated unit. A DIY build using a galvanised stock tank, a correctly sized aquarium chiller, a circulation pump, an inline filter, and an ozone or chlorine sanitizer delivers equivalent cooling performance for $900–$2,200. IceColdTubs.com (June 2026): “The best DIY cold plunge for most people is an insulated stock tank paired with a 1/4–1/2 HP water chiller, a circulation pump, a 50-micron filter, and an ozone or chlorine sanitizer — a build that costs about $900–$2,200 versus $4,000–$5,000 for a prebuilt all-in-one, and goes together in roughly 2–4 hours once the parts arrive.”
| Approach | Cost range | Ongoing cost | Best for |
|---|---|---|---|
| Stock tank + ice only | $170–$330 | $10–$20/session (ice) | Testing cold plunging before committing; occasional use |
| Chest freezer conversion | $225–$665 | Electricity only (~$10–$20/month) | Sub-45°F targets; budget-conscious builders comfortable with DIY sealing |
| Stock tank + chiller (recommended) | $668–$2,000 | Electricity only (~$15–$25/month) | Daily use; best long-term value; 2–4 hour build |
| Commercial all-in-one | $4,000–$10,000+ | Low maintenance time | Convenience priority; commercial or wellness business use |
Container options
The container determines volume (which drives chiller sizing), body fit, insulation potential, and how long your build lasts. Five viable options:
| Container | Cost | Pros | Cons | Best for |
|---|---|---|---|---|
| Galvanised steel stock tank (100 gal) ⭐ | $100–$200 | Watertight out of the box; right shape; widely available; durable; outdoor-rated | Loses heat quickly uninsulated; galvanised taste in first fill — flush before use | The go-to choice. Most popular DIY approach in 2025–26. Rubbermaid and Tarter are the most cited brands. |
| Poly stock tank (100–150 gal) | $150–$250 | Food-safe plastic; no metallic taste; durable | Same heat-loss issue without insulation; slightly more expensive | Anyone concerned about galvanised steel; families with children |
| Chest freezer conversion | $100–$300 (used) | Built-in insulation; reaches <45°F without a separate chiller; low operating cost | Must seal ALL seams watertight with epoxy — it is NOT designed to hold water; requires pond liner; more DIY skill required | Sub-45°F targets; cold climates; budget builders comfortable with epoxy sealing work |
| IBC tote (275 gal HDPE) | $75–$150 (used food-grade) | Very large volume; food-grade; inexpensive | Large footprint; less comfortable body position; harder to plumb | Homesteaders; outdoor setups where space is unlimited |
| Inflatable pool / tub | $50–$200 | Cheapest; portable; no installation | Poor insulation; no good chiller connection points; not durable | Testing cold plunging before committing; travel setups |
PlungeCoach.com (Feb 2026): “Stock tanks are built for one purpose: holding water for livestock. That means they are inherently watertight, corrosion-resistant, and designed to sit outdoors for years.” No sealing required, no pond liner needed, natural shape for seated immersion to shoulders, and plumbing connections are straightforward with standard bulkhead fittings. Available at Tractor Supply, Rural King, and Amazon.
Insulation — the single most important upgrade
An uninsulated galvanised stock tank in warm weather loses temperature so rapidly that a small chiller runs continuously without ever reaching your target. PlungeCoach.com documents that basic insulation reduces chiller energy costs by 25–40%. The insulated lid is identified as “the single most impactful insulation upgrade” available — the water surface is the largest single heat gain point.
| Method | Cost | Effect | How to apply |
|---|---|---|---|
| Insulated foam lid ⭐ Start here | $15–$40 | Highest impact — eliminates surface heat gain and evaporation | Cut 1.5”–2” XPS rigid foam board (pink foam) to fit the top of the stock tank; trim for a snug fit; add a handle. This is the first upgrade for any build. |
| Reflective bubble wrap (exterior) | $20–$40 | Moderate — reduces solar and ambient heat gain on sides | Wrap exterior of tank in reflective insulation; secure with foil tape. Quick effective temporary solution. |
| Rigid foam board exterior (1” XPS) | $25–$60 | Good — better R-value than reflective wrap; durable | Cut pink foam panels to fit each side and base; secure with construction adhesive and straps. |
| Spray foam exterior | $30–$80 (2–4 cans) | Excellent — no gaps; highest R-value per inch | Apply closed-cell spray foam to exterior walls and base; 1”–2” continuous layer; can be painted. |
| Cedar surround + foam fill | $150–$400 | Excellent + premium aesthetics | Build a cedar or pressure-treated lumber frame around the tank; fill gap with rigid foam or spray foam. Creates a finished product indistinguishable from commercial units at a fraction of the cost. |
Chiller selection
The chiller is the most expensive component and determines whether your build actually reaches 50–55°F. An undersized chiller in a warm climate never reaches target temperature regardless of everything else you do.
| Your situation | Recommended chiller | Why |
|---|---|---|
| 100-gal insulated tank, indoors or shaded, below 85°F ambient | 1/4 HP | Well-insulated tank in moderate climate is the easiest chilling scenario. 1/4 HP handles this comfortably. |
| 100-gal insulated tank, outdoors, moderate climate | 1/4 HP | With good insulation (foam lid + exterior wrap), 1/4 HP handles MN summer temps (high 80s–low 90s) per Joe Krause’s documented 3-year outdoor testing. |
| 100-gal uninsulated, or direct sun exposure | 1/2 HP | Uninsulated tank or direct sun significantly increases heat load. 1/2 HP provides necessary headroom. |
| Extreme climate (90°F+ sustained) | 1/2 HP minimum | At sustained 90°F+, a 1/4 HP will struggle to maintain 50–55°F target. 1/2 HP delivers 70% more BTU/hr for only 50W more power. |
| 150+ gallon tank, any climate | 1/2 HP or larger | Volume drives cool-down time. For 150 gallons, a 1/4 HP is slow to cool from warm water. |
Joe Krause (DIY Cold Plunge, April 2025) after testing every major cold plunge chiller in real outdoor MN conditions: “1/4 HP is what 90% of people need to consider. 1/2 HP if you are in an extreme climate.”
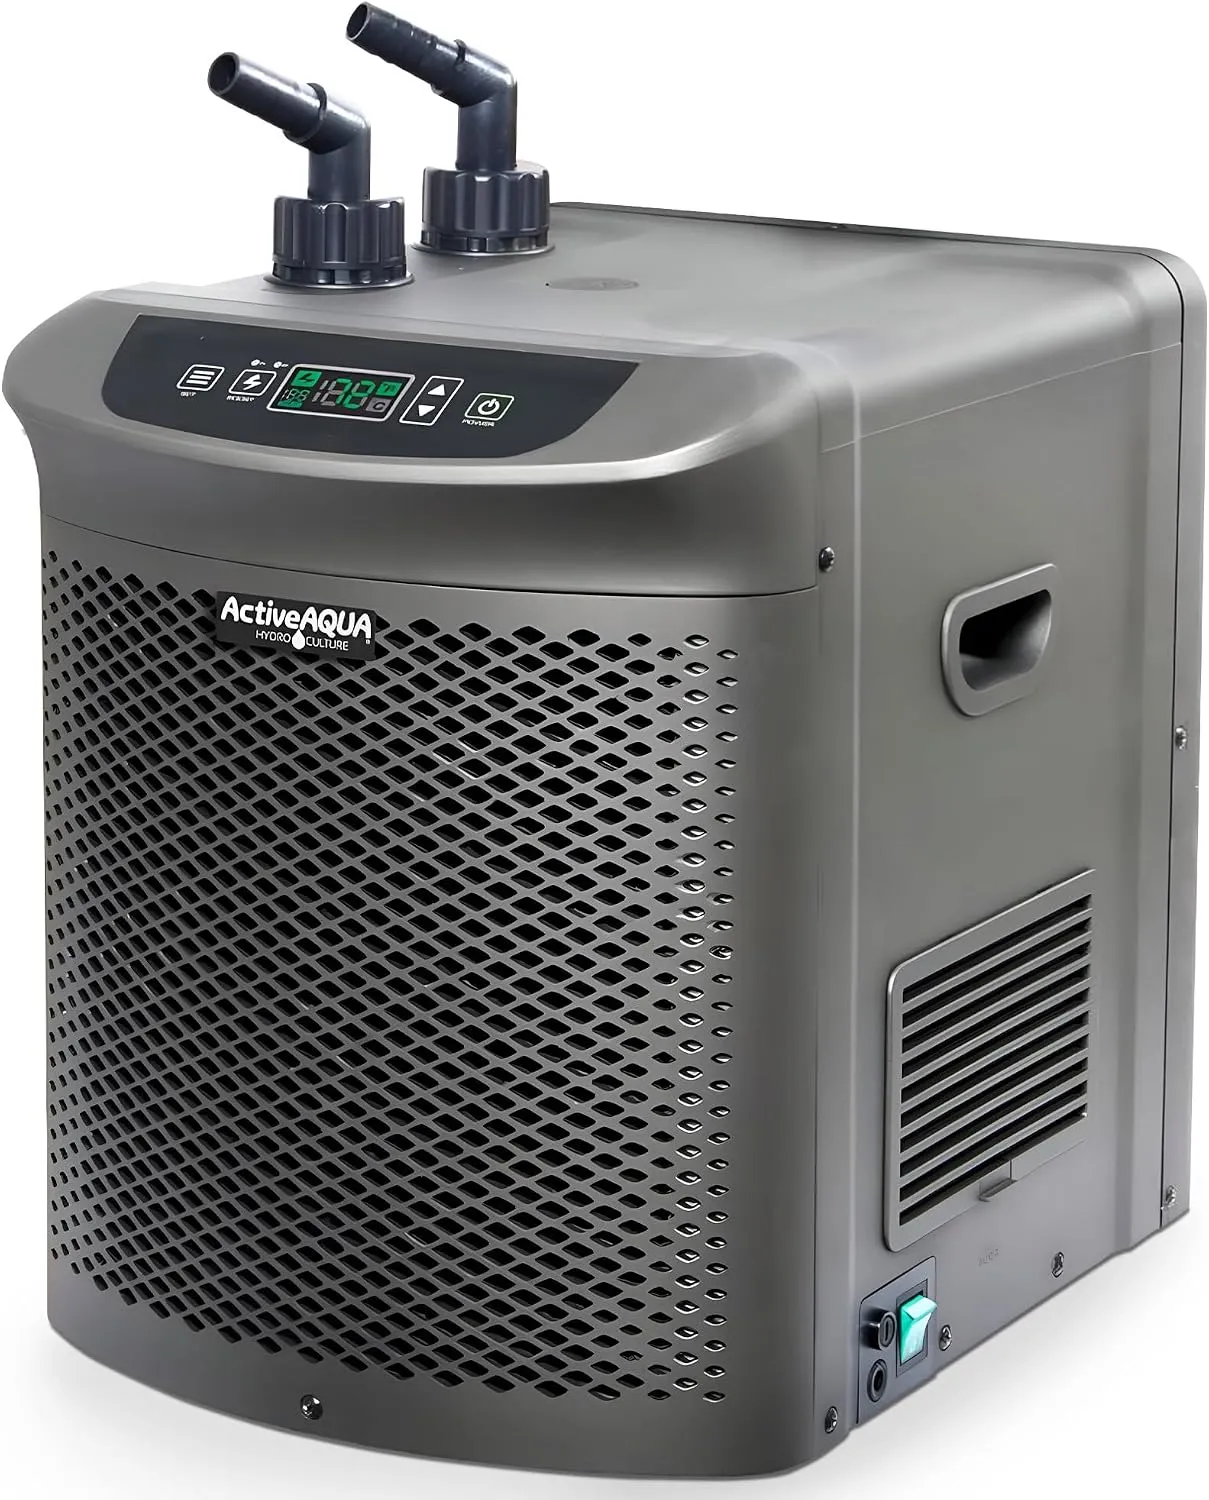
3,010 BTU/hr · 460W · pure titanium evaporator. The most durability-tested cold plunge chiller in the DIY community. Used as OEM chiller inside Plunge, Renu, and ModTub systems. Prices have risen since early 2025 data — check current.
Check price on Amazon →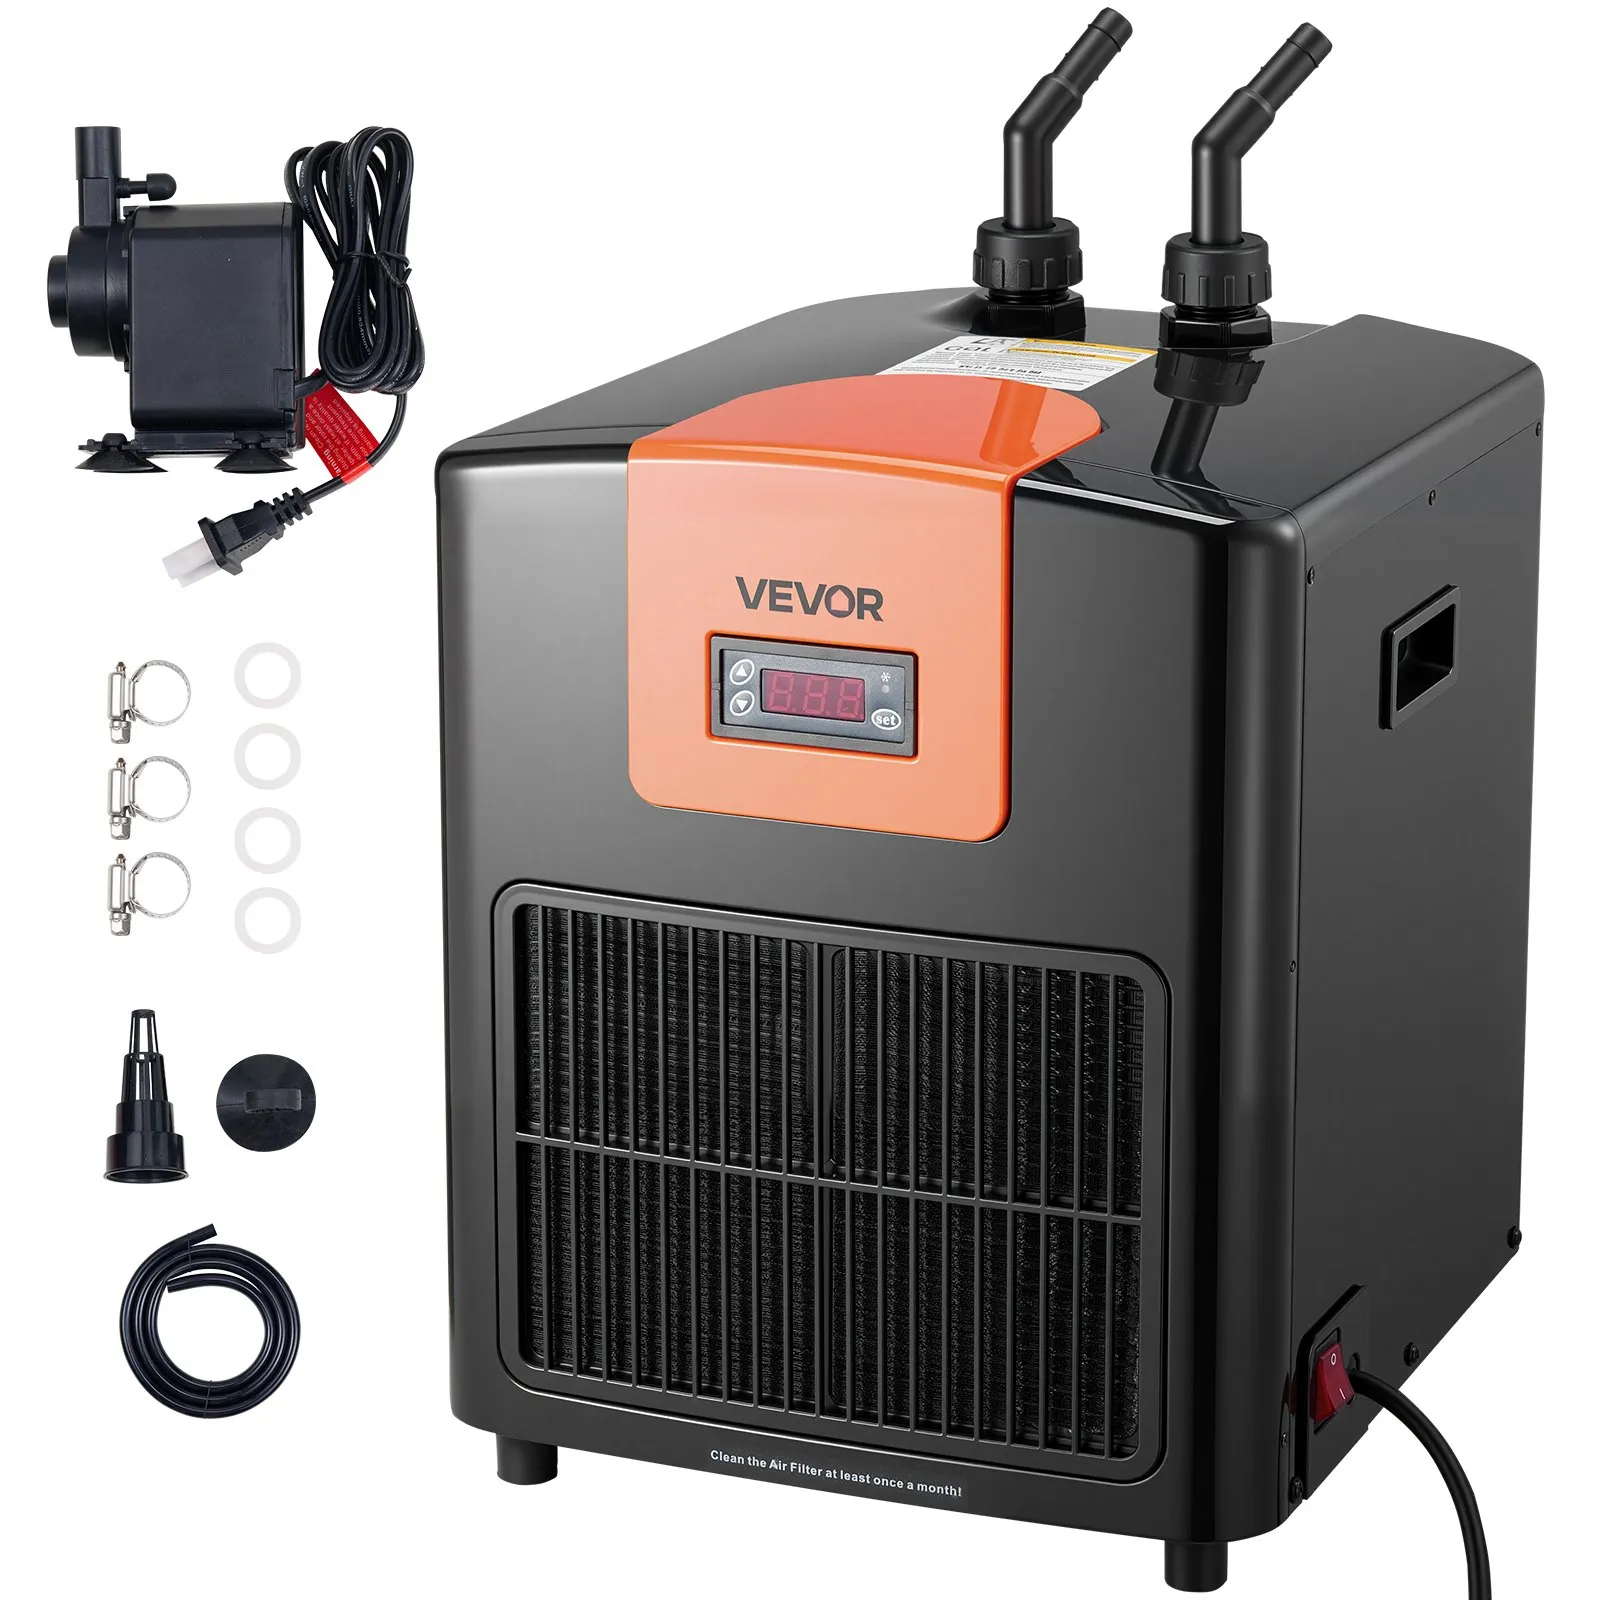
R290 refrigerant · titanium evaporator · pump, hoses, and fittings included. Confirmed on 150-gallon insulated cold plunge tubs at 48°F in 90°F Florida ambient. See our full Vevor CL-850 review →
View on Vevor — $389.90 →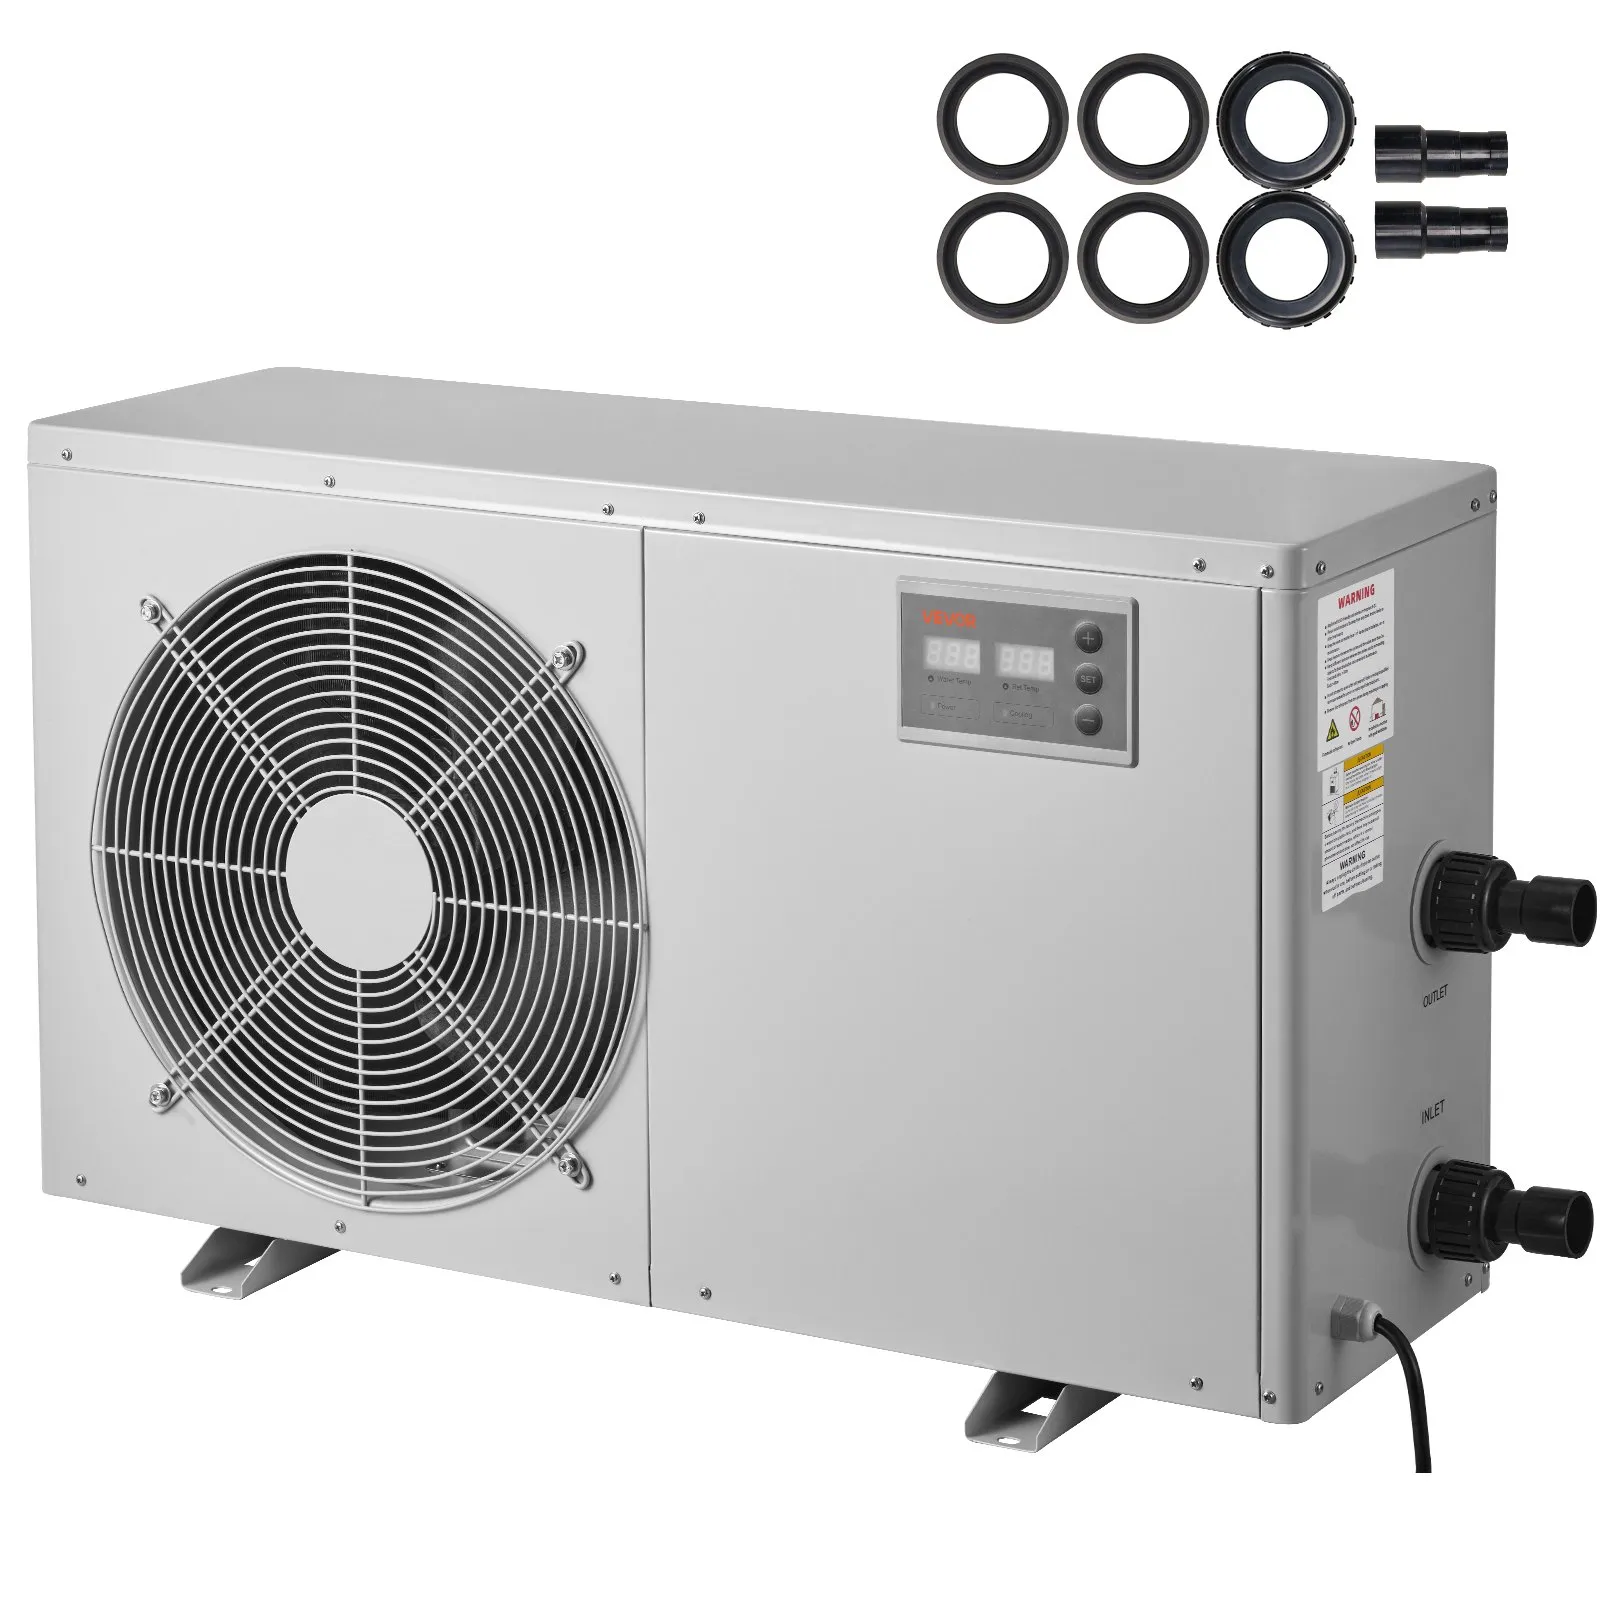
For large DIY builds 100–200 gallons, outdoor setups in hot climates, or anywhere the 1/3 HP runs out of headroom. See our Vevor 1.5 HP review →
View on Vevor — $905.90 →For a detailed HP comparison including BTU data and the full durability testing log, see our 1/4 HP vs 1/2 HP cold plunge chiller guide →
Pump & filtration
Circulation pump
The pump moves water from the tub, through the filter and chiller, and back. Without adequate circulation, the chiller only cools water near its inlet. Size your pump to turn over the full water volume every 4–6 hours:
- 60-gallon tub: 600–900 GPH
- 100-gallon tub: 1,000–1,500 GPH
- 150-gallon tub: 1,500–2,250 GPH
Most Vevor aquarium chillers ship with an included pump in the 264–660 GPH range — adequate for small tubs, consider upgrading for 100+ gallon setups. The Danner Mag-Drive is the most frequently cited pump in DIY cold plunge community builds (documented by Andrew Conner and multiple PlungeCrafters guides). Seaflo and Aquatop are other commonly used alternatives. Confirm the pump is rated for continuous use in cold water approaching 39°F.
Filtration
A 50-micron inline filter cartridge housing is the community standard. IceColdTubs.com: “The filter is the difference between draining your tank every few days and changing the water once a month.” Andrew Conner’s documented build uses two whole-house filter housings in series for crystal-clear water — many experienced builders adopt this two-stage approach.
| Filter option | Cost | Performance | Notes |
|---|---|---|---|
| Single 10” 50-micron cartridge housing | $20–$40 housing + $5–$15/cartridge | Good | Standard starting point; install between pump outlet and chiller inlet |
| Two 50-micron housings in series ⭐ | $40–$80 housings + $10–$30/cartridges | Very good | Andrew Conner’s documented build; noticeably cleaner water; recommended for multiple daily users |
| No filter | $0 | Poor | Water degrades in days; change water every 2–7 days; not suitable for any chiller build |
Plumbing it together
The standard cold plunge loop flows: Tub → pump → inline filter → chiller → back to tub.
- Mark inlet and outlet positions. Inlet near the base of the tub (draws water until nearly empty); outlet near the top (surface turbulence mixes and oxygenates).
- Drill bulkhead holes in the stock tank walls to match your fitting diameter. Typical 3/4” or 1” hose systems use 1-1/4” to 1-1/2” holes for their bulkhead fittings.
- Install bulkhead fittings with rubber gaskets. Thread sealant paste (not just Teflon tape) on all NPT threads. Tighten hand-tight plus 1/4 turn.
- Connect the loop: inlet bulkhead → pump → filter(s) → chiller → outlet bulkhead. Use flexible PVC spa hose (not garden hose) with worm-gear hose clamps at every connection.
- Fill before testing. Fill the tub with water, run the pump only for 10–15 minutes, and inspect every connection for leaks before connecting any electrical components.
Use flexible PVC spa hose, not standard garden hose — garden hose is not rated for constant cold water flow. Use non-hardening thread sealant paste on NPT threads — it fills irregularities better than Teflon tape alone. Leave extra hose length rather than cutting everything tight — future filter or chiller changes will be much easier with a few extra inches of slack.
Sanitation
Filtration removes particles. Sanitation kills bacteria. Both are required. Without sanitation, even a well-filtered cold plunge can develop dangerous bacterial levels within 1–2 weeks of regular use. For a full breakdown of every sanitation method see our cold plunge water maintenance guide. The community top picks:
| Method | Cost | How to use | Notes |
|---|---|---|---|
| Ozone generator ⭐ Community favourite | $40–$120 (Ambohr SPA-124 most cited) | Install venturi injector inline; run 30 min/day on a timer | No chemical handling; water feels very clean; breaks down to oxygen; most popular DIY method |
| Chlorine (dichlor granules) | $15–$30 | Maintain 1–3 ppm free chlorine; test weekly; adjust pH 7.2–7.6 | Cheapest; most accessible; familiar to pool owners; mild chemical smell possible |
| Bromine (tablets) | $20–$40 | Maintain 3–5 ppm; floating dispenser or inline feeder | More stable than chlorine at lower pH; less odour; preferred over chlorine for cold water by some spa chemists |
| Hydrogen peroxide (H2O2) | $15–$40 (food-grade) | Maintain 30–50 ppm; pair with ozone for best results | No halogens; degrades to water and oxygen; pairs naturally with ozone; test with H2O2-specific strips |
Temperature protocols
| Experience level | Target temp | Session duration | Notes |
|---|---|---|---|
| Complete beginner (week 1–2) | 58–62°F | 1–2 minutes | Start warmer than you think you need; build the habit before pushing temperature |
| Building routine (month 1–2) | 54–58°F | 2–4 minutes | As cold shock response diminishes, gradually lower temperature |
| Established (month 3+) ⭐ Evidence-based range | 50–55°F | 4–8 minutes | Research-supported recovery range; where most physiological benefits accumulate |
| Advanced / athletic recovery | 45–55°F | 5–15 minutes | Below 50°F provides marginal additional physiological effect; shorter sessions at lower temps are as effective as longer at higher |
Weekly dose: Research synthesis from Marterra Elements (2026) points to 8–11 total minutes per week as the evidence-supported dose. Three 3-minute sessions per week achieves 9 minutes — the minimal effective dose. Daily 1–2 minute sessions work equally well for mood and energy benefits.
All sources agree: warm up through movement after cold plunging — not immediately through a hot shower or sauna. Re-warming by shivering and light movement (brisk walk, air squats) allows the full norepinephrine and dopamine response to complete. Jumping straight into a hot shower blunts this effect significantly.
Complete bill of materials
Build A — Stock tank + ice (entry level, under $330)
| Component | Spec | Cost |
|---|---|---|
| 100-gal galvanised stock tank | Rubbermaid or Tarter; Tractor Supply, Rural King, or Amazon | $120–$200 |
| Insulated foam lid | 1.5”–2” XPS rigid foam cut to fit + handle | $15–$30 |
| Exterior insulation (optional) | Reflective bubble wrap + foil tape | $20–$50 |
| Digital thermometer | For monitoring water temperature | $10–$20 |
| Ice (per session) | 20–40 lbs; achieves 45–55°F | $10–$20/session ongoing |
| TOTAL one-time | $165–$300 |
Build B — Stock tank + chiller (full permanent build, $668–$2,000)
| Component | Spec | Cost |
|---|---|---|
| 100-gal galvanised or poly stock tank | Rubbermaid or Tarter; Tractor Supply, Rural King, Amazon | $120–$200 |
| Aquarium chiller — 1/4 HP | Active Aqua 1/4 HP (check current price) or Vevor 52-gal 1/10 HP ($283.90) | Check current — see links above |
| Aquarium chiller — 1/3 HP (recommended alternative) | Vevor 110-gal 1/3 HP — pump and hoses included | $389.90 |
| Circulation pump | Danner Mag-Drive or equivalent; 600–1,200 GPH; rated for cold water continuous use | $30–$80 |
| 50-micron filter housing (×2 recommended) | Standard 10” whole-house filter housing + initial cartridges | $20–$40 each; $5–$15/cartridge |
| Ozone generator + venturi | Ambohr SPA-124 or equivalent | $60–$120 |
| Bulkhead fittings (×2) | 3/4” or 1” bulkhead with rubber gasket | $8–$15 each |
| Flexible PVC spa hose (10–15 ft) | 3/4” or 1” diameter; rated for continuous cold water flow | $20–$50 |
| Hose clamps, thread sealant, fittings | Misc plumbing supplies | $20–$40 |
| Insulated foam lid | 1.5”–2” XPS foam board cut to fit | $15–$30 |
| Exterior insulation | Spray foam + cedar surround (premium) or rigid foam panels (budget) | $50–$400 |
| Digital thermometer | Smart probe or basic digital | $15–$50 |
| TOTAL — entry build (Vevor 1/3 HP, basic insulation) | ~$668–$900 | |
| TOTAL — full build (1/2 HP, cedar surround) | ~$1,050–$2,000 |
Build C — Chest freezer conversion ($225–$665)
| Component | Spec | Cost |
|---|---|---|
| Used chest freezer (20–25 cu ft) | Large enough for shoulder immersion when seated; sourced used from Facebook Marketplace or Craigslist | $100–$300 |
| Pond liner (reinforced PVC or EPDM) | Sized to fit interior; protects against galvanised metal corrosion; ensures watertight seal | $30–$80 |
| JB Weld Water Weld epoxy | For sealing all interior seams before liner installation; this step is non-negotiable | $10–$20 |
| Inkbird temperature controller | Prevents over-freezing; plugs between wall outlet and freezer; turns compressor off at target temp | $25–$45 |
| Submersible pump | For water circulation inside the freezer; 300–600 GPH | $20–$50 |
| 50-micron filter housing | Inline in circulation loop | $25–$50 |
| Sanitation | Ozone generator or chlorine | $15–$120 |
| TOTAL | $225–$665 |
A chest freezer is NOT designed to hold water. Every interior seam must be sealed with epoxy (JB Weld Water Weld) before installing the pond liner. Skip this step and you will have a leaking freezer. The galvanised metal interior corrodes without a liner. This build requires more skill and patience than a stock tank build — test every seam under water pressure before trusting it. The payoff: sub-45°F temperatures without an external chiller, and built-in insulation that dramatically reduces operating costs.
Maintenance schedule
| Task | Frequency | Action |
|---|---|---|
| Check water temperature | Every session | Verify temperature at target before plunging; deviation indicates chiller, pump, or filter issue |
| Test water chemistry | Weekly | Test free chlorine/bromine and pH; target chlorine 1–3 ppm, pH 7.2–7.6; add sanitizer as needed |
| Run ozone generator | Daily (if installed) | 30 minutes minimum; use a timer for automation |
| Inspect plumbing | Weekly | Look for drips at connections; retighten any loose hose clamps |
| Rinse filter cartridge | Every 1–2 weeks | Remove housing; rinse cartridge under hose water; reinstall; replace when flow drops |
| Wipe waterline biofilm | Monthly | Soft cloth to remove any biofilm ring at the water surface |
| Full water change | Every 1–3 months | Drain; scrub interior; refill; restart sanitation protocol. See our water maintenance guide for full schedule by system type. |
| Winterise (cold climates) | Before first hard freeze | Drain completely; disconnect and store chiller and pump indoors; cover tank |
Want a complete plug-in chiller instead of a DIY build? See our Plunge Chill review for the lowest-cost refrigerated option.
FAQs
How much does a DIY cold plunge cost?
Three price tiers: stock tank + ice only ($165–$300 one-time but $10–$20 per session ongoing); chest freezer conversion ($225–$665); stock tank + chiller ($668–$2,000 depending on chiller size and insulation). The stock tank + chiller build at around $700–$900 for a Vevor 1/3 HP setup is the best long-term value — no ice cost, daily use for years.
What is the best container for a DIY cold plunge?
A 100-gallon galvanised steel stock tank (Rubbermaid or Tarter brand) from Tractor Supply or Rural King. It is watertight out of the box, the right shape for seated immersion to the shoulders, durable enough for outdoor use for 15–30 years, and pairs naturally with standard bulkhead fittings and aquarium chillers. Poly stock tanks are equally good if you prefer food-safe plastic over galvanised steel.
Can a chest freezer be used as a cold plunge?
Yes — with important preparation. A chest freezer must have all interior seams sealed with epoxy (JB Weld Water Weld) and a pond liner installed before it can hold water safely. An Inkbird temperature controller prevents over-freezing. When properly built, a chest freezer conversion maintains 39–55°F with no external chiller, using only the freezer’s compressor. Build cost: $225–$665. The main advantage over a stock tank is built-in insulation and the ability to reach sub-45°F temperatures without an aquarium chiller.
What size chiller do I need for a DIY cold plunge?
For most builds — 100-gallon insulated stock tank, moderate climate below 85°F — a 1/4 HP chiller is what 90% of builders need (Joe Krause, DIY Cold Plunge, April 2025). For hot climates (90°F+ sustained), large volumes (150+ gallons), or uninsulated setups, a 1/2 HP provides necessary headroom. For the complete analysis see our 1/4 HP vs 1/2 HP guide.
How do I keep DIY cold plunge water clean?
Filtration + sanitation + water changes. The minimum: a 50-micron cartridge filter inline with your pump (extends water life from days to weeks), plus a sanitizer — ozone generator (most popular DIY choice), chlorine, or bromine. Test chemistry weekly. Change water every 1–3 months with a complete system. See our full cold plunge water maintenance guide for complete instructions.
How long does it take to build a DIY cold plunge?
2–4 hours once all parts have arrived, for a standard stock tank + chiller build. Sourcing parts (waiting for delivery) typically takes 3–7 days. The chest freezer conversion takes longer — allow a weekend for epoxy application, curing time, and liner installation.
How cold does a DIY cold plunge get?
With a properly sized chiller and insulated tank: 39–42°F minimum (both Active Aqua 1/4 HP and Vevor 1/3 HP are confirmed at this range). Practical working range for cold plunge is 50–55°F for established practitioners. Chest freezer conversions can reach 32–39°F with the Inkbird controller preventing over-freezing.